Hi guys,
You can now get both of my E-books:
Mastering the basics
Instant Guitar
for FREE. Just send an E-mail to bprsawford@aol.com or bprsawford@sky.com
Put "request E-books" in the subject and I will send them directly to your in box.
All I ask is for you to put a comment on my Blog.
If you take my Video test and have any questions you need answering about your Guitar, E-mail me as above and put "Guitar questions" in the subject.
Thanks for visiting my Blog. Have a look at all the other posts as well.
Come back again as I will be getting lots of freebies for you to use.
For more free stuff and how to restring your guitar go here!
Wednesday, 16 November 2011
Tuesday, 25 October 2011
Instant Guitar
Author Bernie Sawford
Inspired by my series of books “Play Guitar Today”
This is my ultimate short cut to playing the Guitar
My simple, easy, proven method for teaching absolutely anyone how to play the Guitar in just 30 minutes or less.
*If you are left handed, just substitute left for right when mentioned.
1:Introduction
2:Pick up
3:PlayTo Play Instant Guitar in 30 Minutes
You Only Need 3 Things.
A Guitar!

Any Guitar Tuner

Why use a Guitar Tuner? Saves you study time, very easy to use, just follow the instructions supplied with it and tune up in seconds! You can use this book without tuning your Guitar but you will sound like you are stroking a Cat with a bag of sharp nails – Not Pleasant!
A Pick (Plectrum)

Optional Extras for the Electric Guitar

Any Amp Set of Jack Leads

Instant Guitar is not about teaching you how to use all the equipment needed to play certain types of Guitars, as this would be a book in itself!
However: Plug your lead into the Guitar and Amp, turn all the controls on the Guitar to full, all the controls on the Amp to halfway, this will give you some sound. Now twiddle about with the controls to your hearts content until you get a sound you like!
Top Tip: When you get a sound you like write down all the settings on the Amp and Guitar on a sheet of paper so you can remember how you created that sound.
The 6 Steps to holding the Pick


When you get to step 4 gently push the pick between your thumb and 1st finger as shown in step 5, you need to grip the pick firmly but not like its in a vice! If when you start playing it flips out just increase your grip a little more.
Holding the Guitar
Sitting Position

Standing Position

When sitting to play, sit in a straight-backed chair or the edge of a bed, cross your right leg over the left leg and let the Guitar rest in your lap.
When Standing adjust the strap so the Guitar is level with your belt line.
Intrigued? You should be!
For your FREE copy of Instant Guitar just email me
bprsawford@aol.com or bprsawford@sky.com
with: free copy of Instant Guitar in the subject.
Lets get you playing.
Thursday, 3 June 2010
Before you buy, free tuner, basic chords, changing strings.
What to look out for before you buy your Guitar!
I want to keep this short and sweet and packed with great information, so I’ve put together a video here for you to look at:
Go here: What to look for
Now you will know what to look out for, before you buy!
How to tune the thing:
To make life easier I have a link to a free desktop Guitar tuner!
Go here: Download Tuner
Download the tuner and have a bit of fun with it. (Turn your speakers on! J)
The notes of each string are E. A. D. G. B. E
Start by tuning the bass E string (the fat one) using the tuner or pitch pipes. Gently turn the tuning key (machine head) to the left or right until the string sound matches the note on the tuner or pitch pipe, loosening the string will lower the note, tightening the string will raise the note. When this string is in tune repeat the process through the other strings, when all are tuned you are now at concert pitch and are ready to play.
How to play the basic open end chords, OOPS! This bit you might need some help with so
Go Here: The Basic Chords
Sling in a few minors and 7ths and your on your way!
Restringing A Guitar
It is important for all guitarists to know how to restring a guitar. Properly maintaining a guitar is vital, part of this is regularly changing the guitar strings. You can get this done professionally but it’s not difficult to change a set of guitar strings yourself.
The first thing you need to think about is what new strings you will be putting on your guitar. There is a wide variety of different strings available and it’s important to select the best set to suit your guitar.
After a few turns the string will go slack and you will be able to unwind the string and remove it from the guitar. You may need to take the pin out that holds the bottom of the string in place at the bridge of the guitar, this usually only applies to some acoustic guitars.
Simply repeat this with all six stings. It is best to take them off one at a time or you will end up with a tangled birds nest of strings! Take a note of how the string was fitted at the bridge, some strings come through the back of the body of the guitar, some are held in by pegs and some will go through a small hole in the steel section behind the bridge. If you have a floating bridge (usually on expensive electric guitars) you might need advice from me personally as this can be daunting if you don’t know how to do it!


Some Examples of strings through the bridge! The white guitar has strings that go through from the back of the body, the black guitar has strings that go through the back of the bridge, this is also the type of bridge that may have the peg fixings. The blue guitar has the daddy of all bridges, this is a floating bridge! Do NOT attempt to restring this one unless you know what you are doing!! Just email me and I'll take you through it.
The next step is to start adding the new strings.
Most people start with the low E and work their way down, however some prefer to start on the high E, there is no right or wrong way when it comes to doing this. Take your first string and thread it though the body of the guitar, or the hole in the steel that you took the string out of, if you have pegs take the ball end of the string over the bridge and then secure the end in the hole using the little pin. Push the peg in firmly taking the ball end into the guitar and then make sure it is not going to pop out soon as your start tightening the string.
Now run the string up the neck of your guitar and make sure it goes into the groove in the nut at the top of the neck. Now thread the top of the string through the hole in the tuning key / machine head and pull it tight. Now bend the string back on itself as much as possible, this will prevent the string from slipping when you tighten it. Now start to turn the tuning key in an anticlockwise direction, this will start to coil the string round and tighten it. It’s wise to keep some pressure on the peg at the bottom of your guitar to make sure this does not pop out.
If you have a guitar with 3 tuners on the top and 3 on the bottom, the bottom 3 tuners are turned in a clockwise direction


As you turn the tuning key the string will start to tighten up. As it does it will slip a few times, this is normal so don’t worry about it. Keep on tightening the string until it gets somewhere near to the correct note as indicated on you tuner or pitch pipe. Don’t try tune the string correctly at this point as new strings tend to stretch a great deal over the first few minutes so it will instantly go out of tune, don't worry is is normal for this to happen. It’s a good idea to pluck the string a few times just to stretch it out a little, however be careful on the lighter strings not to really over tighten them as you may snap them, be guide by your tuner or pitch pipes.
When you have added your first sting it’s simply time to repeat the process with the other strings. Take your time with this and when you get to the high E string make sure you don’t tighten it too fast as this could lead to it snapping. When you have got all the string in place and you have them all reasonably tight, you can then get some wire cutters and snip the ends of the string off. This is not essential but it does make the guitar look far neater.
Finally
When all the strings are in place and you have made sure all the pins at the bottom of your guitar are firmly in place (if you have them) it is now time to tune your guitar again, you may need to do this several times but the strings will settle down.
Your guitar really can make a wonderful sound. However, even the very best guitar can start to sound old and tired if the strings are not changed on a regular basis. It’s therefore important you learn how to restring your guitar and make sure you change guitar stings on a regular basis.
Saturday, 29 May 2010
Lets look at the open end chords up close and personal!
You can get all these chord shapes in book form from almost anywhere so I thought "a picture paints a thousand word" so these photos are what the Chords actually look like when you play them!
In any book A is shown as played with your fingers in a straight line, hey I gotta tell you this is not possible!!!
So this is what your fingers will look like when you are playing!

Lets look at the open end chords up close and personal!
You don't play the strings marked with an X
In the Chord A you don't play the bass E string as you strum!

Again in B7 you don't play the bass E string
I chose B7 as it is a full rich chord and easier to play in this position of the Guitar

You can have a good thrash at this one!
Use all the strings

In this Chord D you don't play the top 2 strings,
nice Chord this one, easy to play and rich in tone!
Get me getting all airy fairy!

This one E is a real rocker!!
Note the natural position of the little finger, this will come in to play later! (excuse the pun!)
 In the Chord F you don't play the bass E string!
 You can play all the strings in the Chord G
 This is the same Chord G as above now if you can master this fingering method then great! It is harder but may help you when you progress and get to mastering how to change chord shapes while playing in time to the beat!
Oh yeah that's still to come!
In any book A is shown as played with your fingers in a straight line, hey I gotta tell you this is not possible!!!
So this is what your fingers will look like when you are playing!

Lets look at the open end chords up close and personal!
You don't play the strings marked with an X
In the Chord A you don't play the bass E string as you strum!

Again in B7 you don't play the bass E string
I chose B7 as it is a full rich chord and easier to play in this position of the Guitar

You can have a good thrash at this one!
Use all the strings

In this Chord D you don't play the top 2 strings,
nice Chord this one, easy to play and rich in tone!
Get me getting all airy fairy!

This one E is a real rocker!!
Note the natural position of the little finger, this will come in to play later! (excuse the pun!)
 In the Chord F you don't play the bass E string!
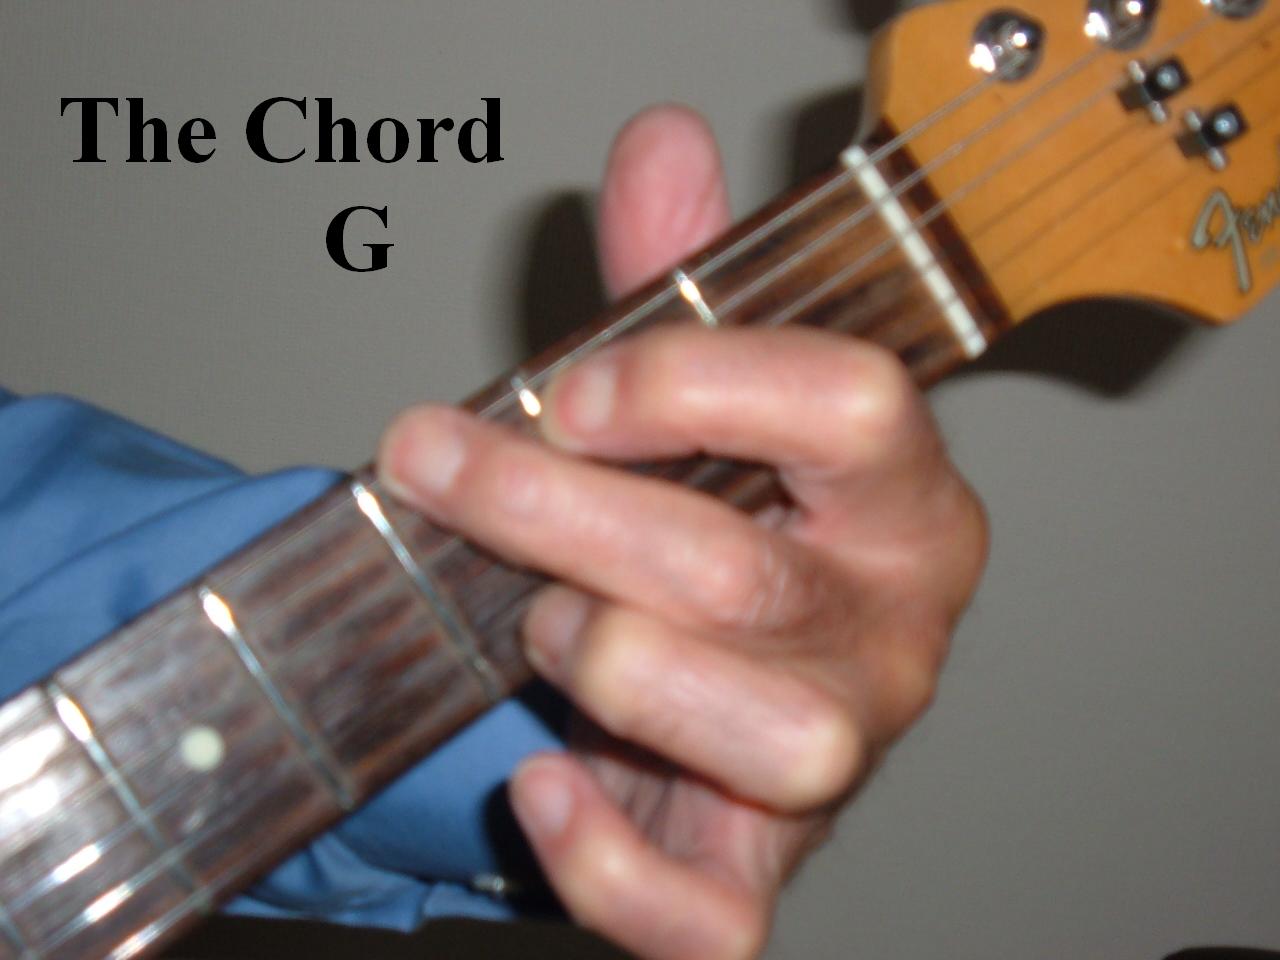 You can play all the strings in the Chord G
 This is the same Chord G as above now if you can master this fingering method then great! It is harder but may help you when you progress and get to mastering how to change chord shapes while playing in time to the beat!
Oh yeah that's still to come!
Thursday, 13 May 2010
Is Your Guitar A Dud or a Babe, Take the Video Test!
Is your Guitar a Dud or a Babe, take the video test and see! Just pause the video to check your Guitar! If you come across a problem with your Guitar just email me bprsawford@aol.com and I will give you my FREE advice as to what can be done to help rectify the problem, most problems are easily solved my friend, so don't worry!
Video Test!
See this on Youtube Click Here!
Video Test!
See this on Youtube Click Here!
Sunday, 9 May 2010
A Few Freebies for you!
I have chosen this desktop tuner as it is easy to download and the site is not covered in ads and crap!
Download Desktop Guitar Tuner Here!
Just go to the site click on download, this will be sent to you in a zip file direct to your desktop screen. Open the zip file as requested and allow file to be accepted, then a box will appear showing "set up" just click yes to every thing prompted, the tuner will then appear ready to use! You will see you can use it for all Guitar types. Be sure to have your speakers turned on!
Just close it all down when you have finished. Next go to your start menu and open "all programs", you will see a new title "GCH Guitar Academy" move your mouse over it and highlight "Guitar Tuner" right click on this and scroll down to "send to" and double right click on "desktop short cut", its now on your desktop ready to use whenever you need it! Cool!
Subscribe to:
Comments (Atom)
